Tutorial
Installation Guide
Thank you for choosing OKEGAS as your AI App Builder! You are about to supercharge your Google Apps Script experience. This guide will walk you through everything you need to know to get started, from installing the extension to setting up your AI models and customizing your coding environment. Let’s dive in!
Navigate to https://okegas.app/download. This link will redirect you directly to the OKEGAS Chrome Web Store page.
Click Add to Chrome to install the extension.
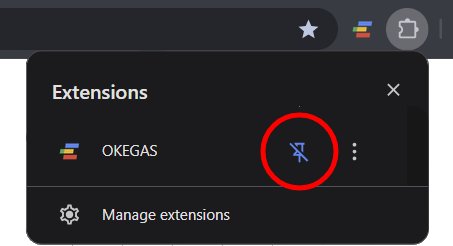
Once installed, click the puzzle piece icon in your browser toolbar and pin the OKEGAS icon for easy access.
The Onboarding Wizard
When you open a Google Apps Script project for the first time after installation, the OKEGAS Onboarding Wizard will automatically launch to help you configure your coding environment chronologically.
Step 1: Activate your plan
On this page, you need to link your account to unlock OKEGAS features.
Insert a valid license key into the input field (this can be a Free, Plus, or Pro plan key).
Click the Activate License button.
If the key is valid, the page will automatically continue to the next step.
How to get your license key:
New Users: Visit https://okegas.app/#purchase, choose a suitable plan, complete the form, and click Place Order. The key will be displayed immediately after.
Existing Users: Open the OKEGAS member page at https://okegas.app/member/, click on the License menu (https://okegas.app/member/digital-licenses/), and copy the license key listed there.
Step 2: Connect a provider
On this page, you need to choose an AI Provider and provide the corresponding API Key. There are 4 AI providers available, and access depends on your active plan.
Google Gemini (Available on all plans): Go to https://aistudio.google.com/, log in, and click Get API Key. Create a new key and paste it into OKEGAS.
OpenRouter (Plus & Pro plans): Create an account at https://openrouter.ai/, go to the Keys section in the dropdown menu, create a new key, and paste it into OKEGAS.
GPT4Free (Pro plan only): Retrieve your API key by going to https://g4f.dev/members.html and clicking the copy icon in the API Key section. Note: You can use GPT4Free without an API key, but using the key will make your usage limit much more generous.
Opencode Local (Pro plan only): This provider does not need an API key, but you must enable Opencode headless mode on your machine.
If Opencode is not installed yet: Open your computer's terminal and run
npm i -g opencode-aito install the package globally. For complete setup details, refer to the Opencode documentation.If Opencode is already installed: Open your terminal and run the command
opencode serve --port 4096 --hostname 127.0.0.1to enable headless mode. Once running, you can select it in OKEGAS.
Skip Option: You are able to click "Skip provider setup for now" to bypass this screen and continue to the next step. If skipped, you will be able to set up your provider later in the extension's popup settings.
Step 3: Final Polish
Tailor the AI's behavior and output to your specific project preferences before you begin.
Default AI Model: Choose the default AI model from the provider you selected in Step 2.
Test Model: Click the Test Model button to make sure the selected AI model connects and works properly.
Default Agent Mode: Select how the AI interacts with your editor.
Chat Mode (Free, Plus, Pro): Standard conversational assistance where you manually review and insert generated code.
Review Mode (Plus, Pro): The AI actively reads your open editor window to provide context-aware suggestions and patches.
Autonomous Mode (Pro): The AI can independently create files, rename them, and execute multi-file search-and-replace operations.
Context Memory Limit: Set how many previous chat messages the AI remembers during a session. Higher memory provides better context for complex tasks but uses more tokens. (Note: The Free plan is unable to change this limit).
Default Frontend Stack: Select the baseline framework for your apps (e.g., Alpine.js + Tailwind CSS, Vue + Tailwind, or jQuery + Bootstrap). You also have the option to set a custom stack if you prefer different libraries.
Default Design Skill: Choose a visual system for the AI to follow (like Glassmorphism, Flat Design, or Bento Grid). You can also choose "No Skill" or define a completely custom design prompt.
Complete Setup: Once all options are finished, click the Complete Setup button. The page will be redirected to your Google Apps Script home, and you are ready to start coding!
Managing Your Extension (Popup Settings)
After completing the onboarding wizard, you can always view or update your global configurations by clicking the OKEGAS extension icon in your Chrome toolbar. The settings popup is organized into three distinct tabs:
Connection Tab
This tab is your command center for managing AI providers, API keys, and selecting your active AI models. (Note: Please look at the Onboarding Tab Step 2 for detailed instructions on how to get the API key for each provider).
Step 1: Choose Provider & Enter API Key
Google Gemini: Enter your API key from Google AI Studio.
OpenRouter: Paste your OpenRouter API key.
GPT4Free: Enter your member API key from
g4f.dev.Opencode Local: Requires no API key, but make sure your local terminal server is running (
opencode serve).
Step 2: Select AI Model Search and select the specific model you want to use from your active provider.
For Google AI Studio: Type "latest" in the model search to easily find and select the newest available models.
For OpenRouter: Type "free" in the search box to filter and use the available free models from OpenRouter.
For Opencode: There are free models directly available to use. You are also able to connect your personal logged-in ChatGPT or Gemini web accounts to Opencode to route your prompts through them.
For GPT4Free: You can choose "Auto" to automatically get the most stable available model, or manually choose from hundreds of other supported models.
Step 3: Test Connection Before moving on, click the Test Model button to verify that your selected model is accessible and working correctly.
Preference Tab
This tab controls how OKEGAS behaves inside your Google Apps Script editor.
Context Limit: Adjust how many previous chat messages the AI includes with each new prompt.
The recommended value for a good balance is Last 3 Messages.
If you want to save tokens, you can choose Last 1 Message (or choose 0 to disable context, but note that this option means the API will have no context regarding your previous chat history).
(Note: This setting is fixed on the Free plan).
Editor Theme: Customize the look of your Google Apps Script coding environment (e.g., toggle a Dark Theme for the editor).
License Tab
This tab provides an overview of your active subscription and allows you to monitor your usage.
Active Plan & Usage Caps: Verify your current license tier and monitor your project's AI token usage limits.
Remove License: If you want to use your OKEGAS license on another device or browser profile, click the Remove License button here to deactivate it from your current browser.
Action Buttons (Bottom of Popup):
After making any changes, always remember to click the Save Settings button.
Click the Open Google Apps Script button to instantly open the script editor page in a new tab so you can start building!
Navigating the OKEGAS Panel in Apps Script
Once your setup is complete and you open a project in Google Apps Script (script.google.com), you will see the OKEGAS interface natively integrated as a floating, offcanvas panel on the right side of your editor. Here is a breakdown of the main interface components:
Top Navigation Bar
The top area of the panel gives you quick access to essential project tools:
Token Usage Monitor: Keep track of your project's AI token consumption based on your plan's limits.
Template Library: Browse and instantly inject pre-built application layouts and UI components directly into your active project.
Clear Chat: Reset your current conversation history to start a fresh context with the AI.
AI Chat Tab
This is your primary workspace for generating and editing code. It is divided into two main areas:
The Onboarding Element: When you start a fresh session, this area welcomes you and provides helpful context. It displays your current active configurations (like your default frontend stack and design skill) and offers quick-start suggestions or prompt examples to help kick off your development process.
The AI Input Area: Located at the bottom of the tab, this is your control center for communicating with the AI.
Text & Image Input: Type your prompts or click the image icon to upload mockups and wireframes for the AI to analyze.
Prompt Enhance: Click the sparkle icon to automatically optimize and rewrite your prompt for better AI understanding.
Agent Mode Selector: Switch between Chat Mode (standard conversational help), Review Mode (context-aware code suggestions based on your open editor), and Autonomous Mode (allows the AI to create, rename, and patch multiple files independently).
Database Tab
Modern web apps need a place to store data. This tab allows you to configure your app's data layer by choosing between two distinct database providers:
Spreadsheet (Default): The simplest and most native option for Google Apps Script. By pasting a Google Sheet URL into this section, OKEGAS will instruct the AI to use Google's built-in
SpreadsheetAppservice to read, write, and manage data directly within that specific spreadsheet.Baserow SQL (Pro): For applications requiring a robust, relational database structure. You can connect your Baserow account using an API token. This integration allows you to create new databases, automatically build tables and fields from AI-generated schemas, and choose whether your app communicates with Baserow via the client-side browser or securely through the server-side
Code.gsfile.
Integration Tab
This tab is packed with features to extend, preview, and deploy your application. It is organized into three distinct subtabs:
Workspace: A library of quick-insert code snippets specifically designed for Google Workspace services. Easily integrate functionality to interact with Gmail, Google Calendar, Google Drive, Docs, and Contacts directly into your app.
Free APIs: Access handy templates and integration points for popular, free-to-use public APIs. This allows you to quickly enrich your application with external data (like weather, placeholder images, or public datasets) without needing complex setups.
Hosting: Your deployment hub for sharing your completed web app with the world.
Publish to OKEGAS: Instantly publish your finished application directly to an
okegas.appsubdomain for immediate access.Custom Domain (Standard iframe code): Provides a ready-to-use HTML iframe snippet of your deployed app that you can simply copy and paste into any external web host or site builder.
Custom Domain (Blogspot XML code): Generates a complete XML template ready to be pasted directly into a Blogger/Blogspot theme to seamlessly host your app.
Cloudflare Workers (Proxy): Provides the necessary proxy setup and code so you can use Cloudflare Workers to display your app iframe securely and cleanly under your own domain.
Toolbar Controls (outside panel)
In addition to the main offcanvas panel, OKEGAS also injects a handy set of controls directly into your native Google Apps Script editor toolbar (near the top of the screen).
Look for the OKEGAS Button Group, which provides three quick-action buttons designed to help you manage your workspace layout efficiently:
Toggle Left Sidebar: Click this to quickly hide or show the native Apps Script file menu on the left side of your screen. Hiding it gives you maximum screen real estate for your code and the AI assistant.
Toggle OKEGAS AI Panel: Use this button to smoothly slide the right-side OKEGAS AI panel in or out. This is useful when you want to focus purely on manual coding without the AI interface taking up space.
Toggle App Preview: Click this button to instantly split your screen and show a side-by-side iframe of your live web app. This is also where you set the Live Preview URL, simply paste your deployed Google Apps Script Web App URL into the App Preview container to view and refresh your live app instantly as you make code changes.
Using the AI Assistant
Now that you are familiar with the interface, it’s time to start building! The AI Chat Tab is designed to handle everything from simple code snippets to generating full, multi-file applications.
Chat Onboarding Element
When you start a fresh session or open a new project, the AI Chat tab displays an onboarding element to help you set the foundation for your app.
Frontend Stack Dropdown: Here you define the core technologies the AI will use to build your app. You can choose from:
Let AI choose: This option gives the AI full freedom to select the best frontend framework and styling libraries based strictly on the specific requirements of your prompt.
Alpine.js + Tailwind CSS: The recommended all-rounder; provides the highest AI accuracy and clean, utility-first styling.
Vue.js + Tailwind CSS: Best for more complex dashboards and multi-view applications.
Alpine.js + DaisyUI: Excellent for a mobile-app look with built-in themes and components like bottom navigation.
jQuery + Bootstrap: The proven, familiar stack with tons of classic examples.
Vanilla JS + PicoCSS: Minimal code with classless beauty; great for simple, lightweight apps.
Custom: Allows you to define your own specific combination of libraries.
Design Skill Dropdown: This instructs the AI on the visual style your application should follow. By selecting a skill (like Glassmorphism, Neobrutalism, or Bento Grid), the AI automatically applies beautiful, cohesive styling to your generated code so it looks professional instantly. You can also choose "No Skill" or write a Custom Skill to define your own unique aesthetic.
Database Setup Button & Modal: If you haven't connected a database yet, there is a handy button here to set it up. Additionally, if you try to ask the AI to perform a data-heavy task without a database, a helpful reminder modal will automatically appear, prompting you to configure your Spreadsheet or Baserow connection first.
Example Prompt Cards: Not sure where to start? Click on one of the provided example prompt cards to instantly send a well-crafted request to the AI.
Interacting with the AI
There are two primary ways to send instructions to the OKEGAS assistant:
Sending a Text Prompt: Type your request into the chat box. Click the AI Enhance button (the sparkle icon) to automatically rewrite and optimize your prompt for maximum AI comprehension before sending it.
Sending an Image (Multi-modal Vision): OKEGAS can "see" your designs. You can click the Image icon to upload a file, OR you can simply copy and paste an image directly into the prompt input. Add instructions like "Turn this mockup into functional HTML and Tailwind CSS" and the AI will generate the code to replicate it.
Important Note on Images: Not all AI models support visual input! To use this feature, you must ensure you have selected a multi-modal vision model (such as Gemini 1.5 Pro, Claude 3.5 Sonnet, or GPT-4o) in your Connection Settings.
💡 Important Note on Code Quality: The intelligence, accuracy, and overall quality of the generated code depend entirely on your Active AI Model. If you are doing complex tasks, ensure you are using a powerful, modern model.
Choosing Your AI Agent Mode
Next to the chat input, you can select how the AI operates:
Chat Mode: Standard conversational assistance. You ask questions, and it gives you code blocks to manually copy or insert.
Review Mode: The AI reads the code currently open in your Apps Script editor to provide context-aware suggestions, bug fixes, and line-by-line patches.
Autonomous Mode: The AI acts independently to create new files, rename them, and execute complex multi-file updates across your entire project based on a single prompt.
Applying Code & Deploying
Once the AI generates your code, OKEGAS makes it incredibly easy to apply and share:
Reviewing and Patching: For new files, click "Insert" to create them instantly. For editing existing files, OKEGAS uses a
<<<<<<< SEARCH ======= >>>>>>> REPLACEformat to patch specific lines without rewriting the whole document. You will see a visual diff to approve before changes are made.Deployment Button: Located conveniently in the panel, clicking the Deployment button easily opens the native Google Apps Script deployment modal so you can deploy your web app as a new version.
Publish Button: As a fast shortcut, clicking the Publish button will navigate you directly to the Hosting subtab (inside the Integration tab) where you can instantly publish your app to a live
okegas.appsubdomain.
Deep Dive: The AI Agent Modes
OKEGAS features three distinct operational modes, accessible via the dropdown menu located right next to the chat input box. Choosing the correct mode is crucial, as it completely changes how the AI interacts with your Google Apps Script environment. Here is a detailed breakdown of how and when to use each mode:
Chat Mode
Available on: Free, Plus, Pro
Chat Mode is your standard, conversational AI assistant. It acts like a highly intelligent pair programmer sitting next to you.
How it works: In this mode, the AI relies entirely on the conversation history and the prompts you provide. It does not read the code currently open in your editor unless you explicitly copy and paste it into the chat box.
Best used for:
Brainstorming logic or architectural concepts.
Asking general programming questions (e.g., "How do I fetch data from a public API in Apps Script?").
Generating boilerplate code or standalone functions.
Creating the initial structure of a brand-new application.
Workflow: You send a prompt, the AI replies with an explanation and a clean code block, and you manually click "Copy" or "Insert" to place that code into your active file.
Review Mode
Available on: Plus, Pro
Review Mode gives the AI "eyes" on your actual codebase, making it incredibly powerful for iterating on existing projects.
How it works: When you send a prompt in Review Mode, OKEGAS automatically grabs the code from your currently active Google Apps Script editor window and attaches it to your request in the background.
Best used for:
Finding and fixing bugs in your current script.
Refactoring messy code for better performance.
Asking for specific, contextual modifications (e.g., "Make the table in this file responsive and change the primary buttons to green").
Workflow:
Open the specific file you want to edit (e.g.,
index.html) in the Apps Script editor.Select Review Mode from the dropdown.
Type your request.
The AI will analyze your file and return a precise search-and-replace patch. OKEGAS will show you a visual diff so you can approve exactly which lines will change before anything is applied.
Autonomous Mode
Available on: Pro
This is the most advanced feature in OKEGAS, turning the assistant into an independent developer capable of handling complex, multi-step tasks across your entire project.
How it works: Instead of providing single code blocks for you to manually insert, Autonomous Mode takes temporary control of your workspace. Based on a single, comprehensive prompt, the AI maps out a plan and executes it.
Capabilities include:
Creating multiple new files simultaneously (e.g., automatically generating
Code.gs,index.html, andstyles.cssfrom one prompt).Renaming existing files to match a new architecture.
Executing complex, multi-file search-and-replace operations in the background.
Best used for:
Generating complete, multi-file applications from scratch.
Applying massive, site-wide design changes across several HTML/CSS files.
Importing large database schemas that require changes to both the front end and back end.
Workflow: Select Autonomous Mode, provide a grand, detailed prompt, and watch as OKEGAS systematically builds or updates the project file by file.
Setting Up Your Database
Almost every modern web application needs a reliable place to store and retrieve data. Instead of forcing you to set up complicated external backends manually, OKEGAS handles data storage directly from the Database Tab. You have two powerful options depending on your project’s complexity and your active plan:
Google Sheets
Using a Google Spreadsheet is the most native, straightforward way to handle data in Google Apps Script. It acts as a fantastic, easy-to-manage flat database for most standard applications.
How to set it up:
Open a new tab and create a fresh Google Sheet.
Copy the full URL of that spreadsheet from your browser's address bar.
Open the OKEGAS Database Tab, ensure "Spreadsheet" is selected, and paste the URL into the input field.
Click the Connect button.
How it works: Once connected, OKEGAS automatically includes this spreadsheet's ID in the AI's background context. When you ask the AI to "create a function to save user data," the AI will write native Apps Script code using the
SpreadsheetAppservice to read, write, and format data in that exact file automatically.Initializing the Database (
setupDatabasefunction): After the AI has generated your code and you have deployed the app, you usually need to create the initial tables (headers) in your spreadsheet. The AI typically generates a function for this.Open your native Apps Script file menu (left sidebar) and click on
Code.gs.Look at the top toolbar in the Apps Script editor. In the function dropdown menu, select the
setupDatabase()function (or similarly named function generated by the AI).Click the Run button.
Authorization Required: Because this is the first time the script is trying to modify your spreadsheet, a modal will appear saying "Authorization required."
Click Review permissions. A new Google sign-in window will pop up.
Choose your Google account. You will see a warning that "Google hasn't verified this app."
Click Advanced at the bottom, then click the link that says "Go to... (unsafe)".
Click the Allow button to grant permissions. (Note: It is completely safe to click "unsafe" here! This warning only appears because the app isn't verified globally by Google, but since the code was generated by your AI assistant and lives entirely inside your own private Google account, it is perfectly safe to authorize.)
Baserow SQL
For applications that require robust, relational database structures (like linking users to orders, or posts to comments), a simple spreadsheet isn't enough. Baserow is a powerful open-source database, and OKEGAS integrates with it deeply. If you don't have an account yet, you can sign up at https://baserow.io/signup.
How to set it up:
Retrieve your Database Token: * Go to your dashboard at https://baserow.io/dashboard.
Click the workspace dropdown menu located on the top left of the screen.
Click on the Database tokens menu.
Click the Create token button.
Insert a token name (it can be anything, e.g., "OKEGAS") and select your active workspace.
After the token is created, locate it in the list and click the triple dot icon next to the generated token name.
A popover menu will appear; click the copy icon inside the token field.
Paste this token into the API Token field in the OKEGAS Database Tab.
JWT Session (Advanced Management): Enter your Baserow account email and password to authenticate a JWT session. This grants OKEGAS extended administrative powers, allowing the panel to create, rename, or delete entire databases without you ever having to open the Baserow website.
Select your Connection Mode:
Client-side: The web app will talk directly to Baserow from the user's browser. This is very fast but exposes your API key in the browser's network tab (best for internal or low-security apps).
Server-side: The safest option. The web app sends requests to your
Code.gsfile, which then usesUrlFetchAppto talk to Baserow. This hides your API keys entirely from the end user.
The Schema Auto-Builder: You don't even need to build your tables manually! You can ask the OKEGAS AI in Chat mode to "Generate a Baserow JSON schema for an inventory app." Once the AI gives you the JSON package, paste it into the Schema section of the Database tab. OKEGAS will automatically build all the tables, configure the field types (text, numbers, dropdowns), and even insert sample seed data into Baserow for you in seconds.
Note: If you attempt to ask the AI to perform a data-heavy task (like building a login system or a product catalog) without setting up a database first, OKEGAS will show a helpful reminder modal prompting you to connect either a Spreadsheet or Baserow before proceeding.
Deploying Your Application
Before you can publish your app to a custom domain or share it with the world, you must first deploy your Google Apps Script project as a Web App. This process generates the live URL that powers your application. Here is how to manage your deployments, from your very first launch to ongoing updates.
Your First Deployment & Authorization
When your AI-generated code is ready, follow these steps to push it live:
Open the Deployment Modal: Click the native Deploy button at the top right of your Apps Script editor and select Manage deployments. Alternatively, you can click the convenient Deployment button located right inside the OKEGAS panel to open this modal instantly.
Create Deployment: Click the Create deployment button (usually a subtle text link or a plus icon at the top left of the modal).
Select Type: Click the gear icon next to "Select type" and choose Web app.
Configure Settings:
Version: Make sure the dropdown is set to New version.
Who has access: Change this dropdown to Anyone. This is crucial; otherwise, external users won't be able to view your site.
Click Deploy.
The Authorization Flow (Crucial Step): Because this is the first time you are deploying this specific script as a web app, Google requires you to authorize it.
A prompt will appear saying "Authorization required." Click Authorize access.
A new Google sign-in window will open. Select your Google account.
You will see a warning screen stating, "Google hasn't verified this app."
Click the Advanced link at the bottom of the warning.
Click the link that says "Go to... (unsafe)".
Finally, click Allow to grant all required permissions.
(Note: It is completely safe to click "unsafe" here! The code was generated by your AI assistant and lives securely inside your own private Google account).
Utilizing Your Web App URL
Once the deployment and authorization are complete, Google will provide you with a Web app URL (it ends in /exec).
You can use this URL in two primary ways:
View Full Screen: Copy the URL and paste it into a new browser tab to see your live, public-facing application.
Live Side-by-Side Preview: Copy the URL, click the Toggle App Preview button in your top OKEGAS toolbar, and paste the URL into the preview container. This allows you to view your live app directly inside the editor and refresh it instantly as you continue coding with the AI.
Updating an Existing Deployment
As you continue to use OKEGAS to add features or fix bugs, your live app will not update automatically. You must push a new version.
Click Deploy -> Manage deployments (or use the OKEGAS Deployment button).
Select your active Web app deployment from the list on the left.
Click the Edit icon (the pencil) in the top right corner of the modal.
Under the Version dropdown, always select New version.
Click Deploy. Your live Web app URL will remain exactly the same, but the content will instantly update to reflect your latest code!
Publishing & Custom Domains
Now that you have successfully deployed your application and generated a Web App URL, it is time to give your project a professional home. While you can share the raw Google Apps Script URL, OKEGAS provides powerful, built-in tools to host your app on custom domains cleanly and securely.
To access your deployment options, open the OKEGAS Panel, navigate to the Integration Tab, and click on the Hosting subtab. Here, you will find four distinct ways to publish your application:
Publish to OKEGAS (Instant Publishing)
This is the fastest way to get your app live on a recognizable URL without needing your own hosting server.
How to implement:
In the Hosting subtab, locate the Publish to OKEGAS section.
Page Title: Enter the display title for your web app.
File Name (Slug): Enter the desired URL path (e.g., typing
my-cool-appwill make your linkyourusername.okegas.app/my-cool-app).Web App URL: Paste the live Google Apps Script deployment URL you generated in the previous chapter.
Click the Publish to OKEGAS button.
The Result: Your app is instantly live on the OKEGAS subdomain! As an added bonus, your published app will also be automatically displayed in the public OKEGAS Showcase page for others to see and draw inspiration from.
Custom Domain (Standard iframe code)
If you already have a website (like WordPress, Wix, or a basic HTML server) and want to embed your AI-generated app directly into it.
How to implement:
In the Hosting subtab, find the Custom Domain (Standard iframe code) section.
OKEGAS automatically generates a responsive HTML
<iframe>snippet containing your app.Simply click to copy the iframe code.
Paste this code into the HTML editor of your existing website or page builder.
Custom Domain (Blogspot XML code)
A brilliant, 100% free way to host your app on a custom domain using Google's Blogger infrastructure. OKEGAS generates a complete, blank-slate XML theme designed to override standard blog layouts and serve only your application.
How to implement:
Copy the generated XML template code from the OKEGAS panel.
Log in to your Blogger dashboard and create or select a blog.
Go to the Theme menu on the left sidebar.
Click the dropdown arrow next to the "Customize" button and select Edit HTML.
Delete all existing code in the editor, paste the OKEGAS XML code, and click the Save icon.
Crucial Mobile Setting: Go back to the Theme menu, click the dropdown arrow again, and select Mobile settings. Choose Desktop (or "Show desktop template on mobile devices") and save. If you skip this step, Blogger will force a default mobile theme and your app won't display correctly on phones!
Go to Blogger's Settings to link your own custom domain (e.g.,
app.yourwebsite.com).
Cloudflare Workers (Proxy)
The ultimate, professional deployment method. This hides the fact that your app is built on Google Apps Script entirely, removing iframe restrictions and offering enterprise-grade speed.
How to implement:
Log in to your Cloudflare Dashboard and navigate to Workers & Pages.
Click Create Worker. Give it a recognizable name (like
okegas-proxy) and click Deploy.Once deployed, click Edit code on your new worker.
In the OKEGAS panel, copy the provided Cloudflare proxy script.
Delete the default code in the Cloudflare editor, paste the OKEGAS script, and ensure you replace the placeholder variable in the script with your actual Google Apps Script Web App URL.
Click Save and deploy.
Go to the Triggers tab of your Worker and click Add Custom Domain to route your own website domain directly to this worker.
The Template Library
Sometimes you don’t want to build an application completely from scratch. To help you jumpstart your development, OKEGAS includes a comprehensive Template Library where you can browse and instantly import both free and premium pre-built layouts for your next Apps Script project. Here is how to navigate and utilize the library:
Accessing and Browsing Templates
Open the Library: Click the shop icon located in the top navigation bar of the OKEGAS panel.
Search and Filter: Finding the right starting point is easy. You can use the search field to look for specific keywords (e.g., "dashboard," "contact form"). You can also narrow down your choices by filtering by Category, or by Availability (to view templates already included in your active plan versus premium templates you have purchased).
Importing a Template into Your Project
Once you find a layout that fits your needs, bringing it into your editor takes just a few clicks:
Select the template you want to use.
Click the Import Template button.
An import modal will appear. If you want to see the template in action before committing, click the Demo preview link.
When you are ready, click the Import Template button inside the modal to instantly inject the template's files and code into your active Apps Script project.
Unlocking Commercial Templates
While many templates are included with your plan, the library also features premium, commercial-grade applications. If you select a commercial template that you do not yet own, you will see an Unlock button. Clicking this button will safely redirect you to the OKEGAS shop page where you can purchase the template and add it to your account.
Become a Creator (Submit & Earn!)
The Template Library is updated regularly with fresh designs and applications. But you don't just have to be a consumer—you can be a creator!
If you have built a fantastic web app using OKEGAS, you can submit your own templates to be listed in the library. You can choose to offer them for free to help the community, or sell them as commercial templates to earn money.
To start publishing your own work, visit the Template Submission page inside your member dashboard at: https://okegas.app/member/template-submissions/.
Troubleshooting & Support
While OKEGAS is designed to provide a seamless development experience, you might occasionally run into a hiccup when working with AI models and complex codebases. This chapter covers known issues and how to quickly resolve them.
The AI response is taking a very long time.
High Load: If you are using a free-tier AI model (like Gemini Free or open models via OpenRouter), the provider's servers might be experiencing high traffic.
Thinking Mode: Some advanced models have a "reasoning" or "thinking" phase that intentionally takes longer to plan out complex code before writing it.
Opencode Provider: If you selected Opencode Local, please note that it currently does not support text streaming. This means the AI won't type the code out line-by-line; it waits until the entire response is 100% complete before displaying it on your screen, which can feel like a long pause.
The design of the generated app is not as expected.
Fix: Make sure you are utilizing Design Skills. Selecting a skill (like Glassmorphism or Bento Grid) adds powerful, hidden system prompts that force the AI to apply specific UI/UX rules. Additionally, visual quality is heavily dependent on the AI's capability—try switching to a more advanced model for better aesthetics.
The generated app is too simple or lacks features.
Fix: Vague prompts lead to simple apps. Try clicking the Enhance Prompt button (the sparkle icon) before sending your request. This automatically expands your short idea into a highly detailed architectural prompt. Also, remember that code depth correlates with the intelligence of your chosen AI model.
"Code failed to replace" warning when modifying an existing app.
Fix: When you ask the AI to modify too many things at once, it can sometimes lose track of the exact SEARCH/REPLACE line mapping. Try breaking your request down into smaller, single modifications per chat. Alternatively, try running the prompt again, or switch to a smarter model capable of handling larger context windows.
The AI doesn't remember what we just talked about.
Fix: Check your Context Memory Limit in the OKEGAS extension popup (under the Preference tab). If it is set to 0 or 1, the AI has no memory of previous messages to save tokens. Increase it to a larger number (like "Last 3 Messages") to restore conversational memory.
Unable to send new chat messages.
Fix: Check your Token Usage Monitor in the top bar. You may have hit your project's token limit. The Free plan provides a 300,000 token cap per project, the Plus plan provides 2,000,000 tokens, and the Pro plan offers an unlimited token allowance.
"Invalid API Key" or Connection Errors.
Fix: Open the extension popup and navigate to the Connection tab. Verify that your API key is pasted exactly as it appears on your provider's dashboard, ensuring there are no accidental blank spaces at the beginning or end of the key.
The OKEGAS panel isn't loading properly.
Fix: Simply refresh the Google Apps Script browser tab. Since Apps Script occasionally updates its native DOM, a quick page reload usually resets the OKEGAS interface perfectly.
Getting Additional Support
If you encounter an issue not listed here, or if you just want to share your creations and ask for advice, we are here to help!
Community Support: You can ask questions in our exclusive WhatsApp Group. You will find the invitation link inside your member dashboard at https://okegas.app/member.
Direct Support: Need immediate assistance from the developers? You can chat directly with the OKEGAS team by clicking the floating contact widget located at the bottom right corner of the OKEGAS website.